 购物车与结算区域的深入优化与功能完善
# 今日目标
- 用户登录功能
- 结算支付功能
# 1. 登录与支付
# 1.1 点击结算按钮进行条件判断
说明:用户点击了结算按钮之后,需要先后判断是否勾选了要结算的商品、是否选择了收货地址、是否登录。
在
my-settle组件中,为结算按钮绑定点击事件处理函数:<!-- 结算按钮 --> <view class="btn-settle" @click="settlement">结算({{checkedCount}})</view>1
2在
my-settle组件的 methods 节点中声明 settlement 事件处理函数如下:// 点击了结算按钮 settlement() { // 1. 先判断是否勾选了要结算的商品 if (!this.checkedCount) return uni.showToast({ title: '请选择要结算的商品!', icon: 'none' }) // 2. 再判断用户是否选择了收货地址 if (!this.addstr) return uni.showToast({ title: '请选择收货地址!', icon: 'none' }) // 3. 最后判断用户是否登录了 if (!this.token) return uni.showModal({ title: '黑马优购', content: '还未登录,是否去登录页?', success(e) { if (e.confirm) { uni.switchTab({ url: "/pages/my/my" }) } } }) }1
2
3
4
5
6
7
8
9
10
11
12
13
14
15
16
17
18
19
20
21
22
23
24
25
26
27在
my-settle组件中,使用mapGetters辅助函数,从m_user模块中将addstr映射到当前组件中使用:computed: { ...mapGetters('cart', ['checkedCount']), ...mapGetters('user', ['addstr']), },1
2
3
4
# 2. 我的页面(登录)
# 2.1 定义 my 页面的编译模式
点击
微信开发者工具工具栏上的编译模式下拉菜单,选择添加编译模式:
勾选启动页面的路径之后,点击确定按钮:

# 2.2 实现登录和用户信息组件的按需展示
创建
my-login组件引入登录组件使用
<template>
	<view>
		<my-login />
	</view>
</template>
2
3
4
5
6
7
- 封装个人信息组件
<template>
	<view>
		<my-login />
		<my-info />
	</view>
</template>
2
3
4
5
6
7
vuex中的user模块定义token
  // state 数据
  state: () => ({
    // 收货地址
    address: uni.getStorageSync('address') || {},
	token: ''
  }),
1
2
3
4
5
6通过mapState映射数据
<template>
	<view>
		<my-login v-if="!token" />
		<my-info v-else />
	</view>
</template>

<script>
	import { mapState } from 'vuex'
	export default {
		data() {
			return {

			};
		},
		computed: {
			...mapState('user', ['token'])
		}
	}
</script>

<style lang="scss">

</style>
1
2
3
4
5
6
7
8
9
10
11
12
13
14
15
16
17
18
19
20
21
22
23
24
25
# 2.3 实现登录组件的基本布局
为
my-login组件定义如下的 UI 结构:<template> <view class="login-container"> <!-- 提示登录的图标 --> <uni-icons type="contact-filled" size="100" color="#AFAFAF"></uni-icons> <!-- 登录按钮 --> <button type="primary" class="btn-login">一键登录</button> <!-- 登录提示 --> <view class="tips-text">登录后尽享更多权益</view> </view> </template>1
2
3
4
5
6
7
8
9
10美化登录组件的样式:
.login-container {
  // 登录盒子的样式
  height: 750rpx;
  display: flex;
  flex-direction: column;
  align-items: center;
  justify-content: center;
  background-color: #f8f8f8;
  position: relative;
  overflow: hidden;

  // 绘制登录盒子底部的半椭圆造型
  &::after {
    content: ' ';
    display: block;
    position: absolute;
    width: 100%;
    height: 40px;
    left: 0;
    bottom: 0;
    background-color: white;
    border-radius: 100%;
    transform: translateY(50%);
  }

  // 登录按钮的样式
  .btn-login {
    width: 90%;
    border-radius: 100px;
    margin: 15px 0;
    background-color: #c00000;
  }

  // 按钮下方提示消息的样式
  .tips-text {
    font-size: 12px;
    color: gray;
  }
}
1
2
3
4
5
6
7
8
9
10
11
12
13
14
15
16
17
18
19
20
21
22
23
24
25
26
27
28
29
30
31
32
33
34
35
36
37
38
39
# 2.4 点击登录按钮获取微信用户的基本信息
分析:

需求描述:需要获取微信用户的头像、昵称等基本信息。
为登录的
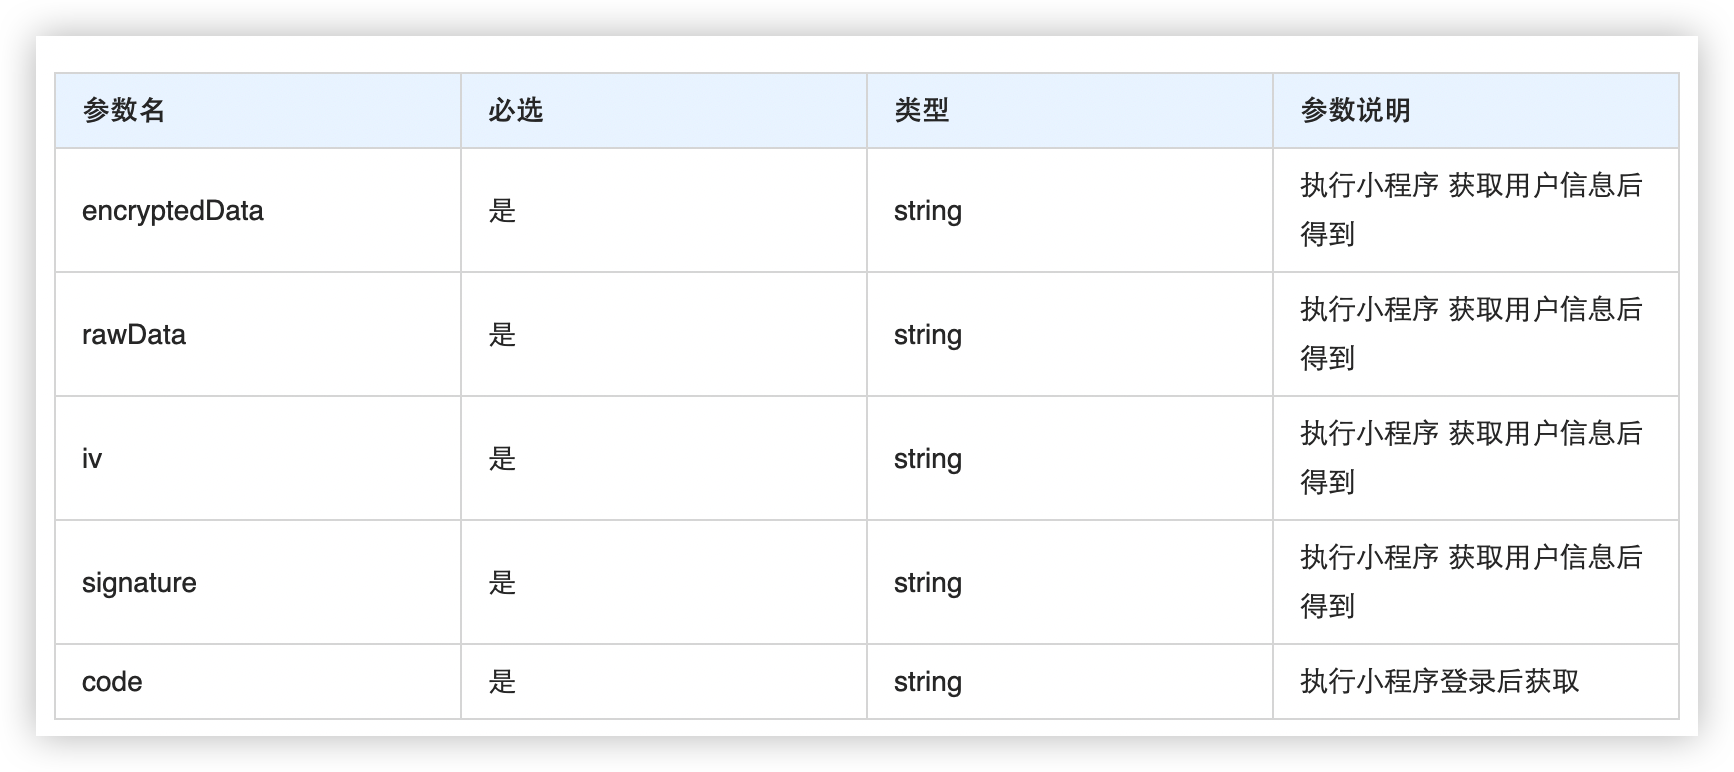
button按钮绑定open-type="getUserInfo"属性,表示点击按钮时,希望获取用户的基本信息:<button type="primary" class="btn-login" @click="login">一键登录</button>1在
methods节点中声明login事件处理函数如下:methods: { // 获取微信用户的基本信息 async login() { // 获取登录参数 const res = await uni.getUserProfile({ desc: '用于测试' }) console.log(res) const { encryptedData, iv, rawData, signature } = res[1] } }1
2
3
4
5
6
7
8
9
10
11调用wx.login方法获取code
// 获取code
const loginRes = await uni.login()
const {code} = loginRes[1]
console.log(code)
1
2
3
4
# 2.5 登录获取 Token 字符串
**小程序id:wxfb52f2d7b2f6123a**
封装请求接口
import fly from '../utils/flyio.js'

export function login(data) {
	return fly.post('/users/wxlogin', data)
}
1
2
3
4
5调用接口
async login() {
  // 获取登录参数
  const res = await uni.getUserProfile({
    desc: '用于测试'
  })
  console.log(res)
  const { encryptedData, iv, rawData, signature  } = res[1]
  // 获取code
  const loginRes = await uni.login()
  const {code} = loginRes[1]
  const query = {
    encryptedData, iv, rawData, signature, code
  }
  console.log(code)
  // 换取 token
  const { data: loginResult } = await login(query)
  if (loginResult.meta.status !== 200) return
  uni.showToast({
    title: '登录成功',
    icon: 'none'
  })
}
1
2
3
4
5
6
7
8
9
10
11
12
13
14
15
16
17
18
19
20
21
22
# 2.6 将 Token 存储到 vuex
在
store/user.js模块的mutations节点中,声明如下的两个方法:mutations: { // 更新 token 字符串 updateToken(state, token) { state.token = token uni.setStorageSync('token', token) }, }1
2
3
4
5
6
7修改
store/user.js模块的state节点如下:// state 数据 state: () => ({ // 收货地址 address: uni.getStorageSync('address') || {}, token: uni.getStorageSync('token') || '', }),1
2
3
4
5
6在
my-login组件中,把 vuex 中的updateToken方法映射到当前组件中使用:methods: { // 1. 使用 mapMutations 辅助方法,把 m_user 模块中的 updateToken 方法映射到当前组件中使用 ...mapMutations('m_user', ['updateUserInfo', 'updateToken']) // 省略其它代码... // 调用登录接口,换取永久的 token async getToken(info) { // 调用微信登录接口 const [err, res] = await uni.login().catch(err => err) // 判断是否 uni.login() 调用失败 if (err || res.errMsg !== 'login:ok') return uni.$showError('登录失败!') // 准备参数对象 const query = { code: res.code, encryptedData: info.encryptedData, iv: info.iv, rawData: info.rawData, signature: info.signature } // 换取 token const { data: loginResult } = await uni.$http.post('/api/public/v1/users/wxlogin', query) if (loginResult.meta.status !== 200) return uni.$showMsg('登录失败!') // 2. 更新 vuex 中的 token this.updateToken(loginResult.message.token) } }1
2
3
4
5
6
7
8
9
10
11
12
13
14
15
16
17
18
19
20
21
22
23
24
25
26
27
28
29
30
# 2.7 结算页获取token
通过mapState获取
computed: {
    ...mapState('user', ['token'])
}
1
2
3
# 3. 登录页面作业说明
获取验证码接口文档:https://apifox.com/apidoc/shared-fa9274ac-362e-4905-806b-6135df6aa90e/api-24945037
流程:
先通过手机号获取验证码,手机号为:13888888888该接口不会给手机发送验证码,也不会在接口响应数据里返回验证码,只会请求成功
验证码输入框输入123456
如果没有发送验证码接口或者发送验证码接口超过1分钟,点击登录手机号13888888888、123456接口会返回验证码过期,此时需重新点击发送验证码
